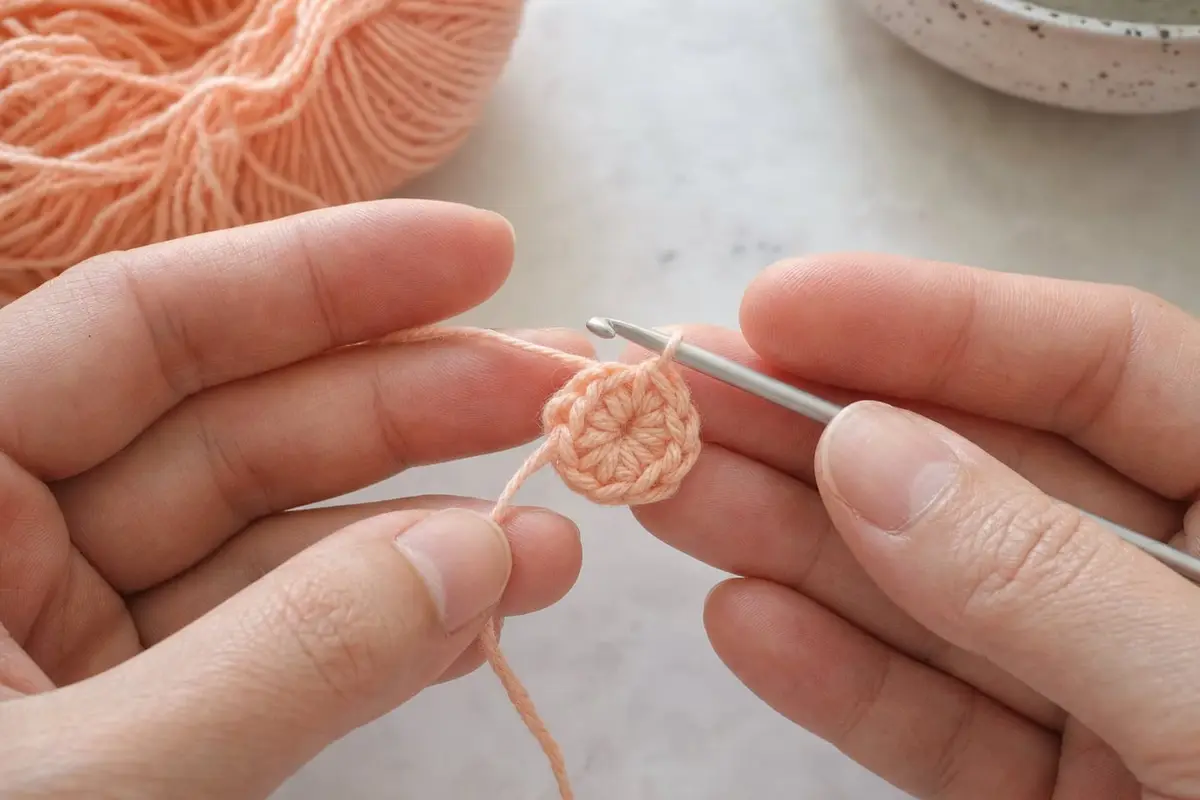
Following Lion Brand's adjustable ring tutorial (2021), wrap the yarn into a loop with the tail behind, pull up a loop, chain 1 (ch 2 for half double, ch 3 for double crochet), work the first round over both the ring and the tail, then pull the tail to close the center. Weave the tail in three directions.
Magic ring — A magic ring, also called a magic circle or adjustable ring, is an adjustable loop of yarn that you work the first round of a piece into, then pull tight with the tail so the center closes with no hole.
Some links on this page are affiliate links: if you buy through them, we may earn a commission at no extra cost to you. It never changes our rankings. As an Amazon Associate I earn from qualifying purchases. Affiliate policy
Anything crocheted in the round, a hat crown, a coaster, a granny square in circles or an amigurumi toy, has to start from a center. The magic ring gives you a center that closes completely. Lion Brand presents it as an alternative to chain starts, which can leave a large hole that is hard to close. It feels awkward the first two or three times, then becomes automatic.
At a glance
| First round in (US) | UK name | Starting chain (Lion Brand, 2021) | Stitches into the ring (Moogly, 2020) |
|---|---|---|---|
| Single crochet (sc) | double crochet (dc) | ch 1, not counted | usually 6 |
| Half double crochet (hdc) | half treble (htr) | ch 2 | as the pattern states |
| Double crochet (dc) | treble (tr) | ch 3 | about 12 |
For practice, use a smooth Medium (4) yarn such as a worsted cotton or acrylic with the hook the Craft Yarn Council’s 2018 guidelines recommend for that weight, 5.5 to 6.5 mm (I-9 to K-10½). Fuzzy, dark or bulky yarns make the ring hard to see and to close: they suit the technique only once you know it.
Other names for the same technique: magic circle, magic loop, adjustable ring, sometimes abbreviated MR. Leave a tail of about 6 inches, work every stitch of the first round over both the ring and the tail, and close the ring before you join or start the second round.
The steps below use US terms and single crochet. If you have not learned single crochet yet, start with how to crochet.
What you need
- A smooth, light-colored yarn and a hook that suits it. Fuzzy yarn makes the ring hard to see and hard to pull closed.
- About 6 inches of tail. Oombawka Design’s photo tutorial starts with a tail of that length, which is enough to close the ring and weave the end in securely.
- A stitch marker if you will keep working in a spiral.
Step-by-step: how to make a magic ring
- Make a loop. Lay the tail across your palm and wrap the working yarn (the end attached to the ball) around two fingers, so it crosses over the tail and forms a loop. The tail should hang down behind.
- Pinch the crossing. Hold the point where the two strands cross between your thumb and middle finger. Everything you do next happens inside the loop, while you keep this crossing pinched.
- Pull up a loop. Insert the hook into the ring from front to back, catch the working yarn and pull a loop back through the ring. Slide the ring off your fingers if you wrapped it around them, keeping the crossing pinched.
- Chain one. Yarn over and pull through the loop on the hook. This chain holds the ring and does not count as a stitch. For taller stitches, Lion Brand starts with ch 2 for half double crochet and ch 3 for double crochet.
- Work the first stitch over both strands. Insert the hook into the center of the ring, so the hook passes under both the ring and the tail. Yarn over, pull up a loop, yarn over and pull through both loops: one single crochet.
- Repeat for the whole round. Work the number of stitches the pattern asks for, often 6 single crochet, every time going under both the ring and the tail. Slide the stitches around the ring as you go so they do not bunch up.
- Pull the tail. When the round is complete, pull the tail firmly. The ring shrinks and the stitches gather into a closed circle. If one side closes and the other does not, pull the tail a little at a time and ease the stitches along.
- Join or spiral. To work joined rounds, slip stitch into the first stitch of the round. To work in a continuous spiral, as most amigurumi patterns do, simply work the next stitch into the first stitch and place a marker in it to show where the round starts.
Count the stitches before you pull the ring closed: fixing the count is easy while the ring is open, and difficult afterwards.
How to keep a magic ring from loosening
A closed ring can slowly open with use and washing, especially in slippery yarns such as cotton or acrylic. The fix happens when you weave in the tail, not when you close the ring.
Moogly’s method weaves the tail around the circle in the direction it was already going, then turns and works back in the opposite direction, then changes direction a third time before trimming. Each change of direction locks the previous one. If you cut the tail right after closing the ring, nothing holds it shut. For stuffed toys, the ring is often at the tip of a piece and the tail can also be hidden inside the stuffing after weaving.
Some crocheters also pull the tail again after working the second round, to tighten any slack that appeared while the first round was stretched.
When to use a magic ring, and when not to
Use it for anything worked in the round where the center should be closed: amigurumi, hats worked from the top, coasters, mandalas and flowers, and granny squares or motifs whose pattern specifies it.
Skip it when the pattern calls for a visible center opening, or when you need a very sturdy center on a piece that will be pulled hard. In those cases, use a chain ring: chain the number of stitches the pattern says, usually two to four, and join with a slip stitch to the first chain, then work the first round into the center of that ring. Lion Brand also mentions working the first round into the first chain of a short chain. Both are simpler for beginners but leave a small hole.
Common problems and fixes
- The ring will not close at all. Some stitches were worked around the ring only, not around the tail. Once Upon a Cheerio’s tutorial makes the same point: every stitch must go over both strands. Undo the round and work it again.
- The ring closes but leaves a gap. Pull the tail harder, then massage the stitches together. A thicker or textured yarn may never close perfectly; a smoother yarn helps.
- The stitches twist around the ring. You are not holding the crossing pinched while you work. Keep your thumb and middle finger on it until the round is complete.
- The tail comes out after a few days. It was trimmed too soon or woven in one direction only. Weave it in three directions, as described above.
Practice it on something small
The best practice is a flat circle: a magic ring with 6 single crochet, then 2 single crochet in each stitch on the second round, for 12 stitches. Make three or four rings in a row, pulling each closed and undoing it; by the fourth, the movement is usually smooth. When you are ready for a real project in the round, an amigurumi kit or a coaster pattern from a designer is a good next step, and our guide to basic crochet stitches explains the half double and double crochet you will need for larger circles.
For a reference you can keep open next to your work, see our comparison of crochet books for beginners.
Key facts
- Lion Brand recommends the adjustable or magic ring as an alternative to starting from a foundation chain, which can leave a large center hole that is hard to close.Lion Brand, Great Beginnings Pt. 3: Magic Ring or Adjustable Ring (Kj Hay), 2021
- In Lion Brand's method, the first round begins with a chain matched to the stitch, ch 1 for single crochet, ch 2 for half double crochet and ch 3 for double crochet, and the tail is pulled to close the ring after the round.Lion Brand, Great Beginnings Pt. 3 (Kj Hay), 2021
- Moogly's magic circle tutorial, updated in 2020, gives magic ring and magic loop as other names for the technique and notes that a single crochet ring usually takes 6 stitches and a double crochet ring about 12.Moogly, The Magic Circle (Tamara Kelly), 2020
- Moogly's 2016 tutorial on keeping a magic circle closed weaves the tail around the circle in its original direction, then back in the opposite direction, then in a third direction before trimming.Moogly, How to Keep a Magic Circle Closed (Tamara Kelly), 2016
FAQ
Is a magic ring the same as a magic circle?
Yes. Magic ring, magic circle, magic loop and adjustable ring are names for the same technique: a loop of yarn you crochet into and then pull closed with the tail. Patterns may use any of these names, and some abbreviate it as MR.
Why won't my magic ring close?
The usual cause is that some stitches were worked around only the ring and missed the tail, so pulling the tail cannot slide them together. Work every stitch of the first round over both the ring and the tail, then pull the tail once the round is finished.
How many stitches go into a magic ring?
Follow your pattern. Six single crochet is a common start for flat circles and amigurumi, and rounds of double crochet often start with about 12 stitches, because taller stitches need more of them to lie flat.
Can I use a chain ring instead of a magic ring?
Yes. Chain a few stitches, usually two to four, and join the last to the first with a slip stitch, then work the first round into that ring. It is easier at first and holds well, but it leaves a small hole in the center that cannot be pulled shut.